Quizalize is a gamified quiz making tool that you can use to drive students engagement, increase their participation, and enhance their learning. The way Quizalize works is similar to the two other gamified tools I reviewed in the past namely Kahoot, Blooket, Quizlet, and Quizizz. Teachers use Quizalize to create various types of quizzes that students can access using a generated code.
As students take their quizzes, teachers gather important insights and analytic data about their performance and track students progress in real time. These reports are especially useful in formative assessment providing teachers with key data to help them plan effective interventions, provide differentiated learning opportunities for students, and inform their lesson planning and teaching strategies.
As a teacher, you can use Quizalize to create quizzes from scratch or you you can search the site’s internal library (i.e., Resources section) for existing quizzes created by other teachers. You can either allow students to take quizzes live in class using one of the two gaming modes Play Leaderboard or Team Vs Team, or you can assign your quiz as a homework for students to take on their own pace.
Compared to other game-based tools, three main features in Quizalize stood out to me: Follow-up activities, the inclusion of curriculum standards, and text-to-speech. As for the first feature, it is especially helpful in providing differentiated learning. As students take quizzes, teachers analyze students scores and identify learning problems and based on the generated results they provide follow-up activities and resources.
These resources can include YouTube videos, PDF worksheets, Web activities, or other Quizalize quizzes. The second feature is the ability to tag quizzes to your states curriculum standards which will allow you access to more detailed information about students performance right within the Gradebook and Mastery Dashboard. However, this feature is only available to premium users.
The last interesting feature that stood out to me is text-to-speech. This is not only an accessibility service that will help students improve their reading comprehension but is also a great tool to help in language learning. You can turn on text-to-speech for each question and answer in your quiz and specify the language for audio output. “The language chosen will provide audio of the language written. For example, choosing “English” will read English text, “Spanish” will read Spanish text, etc.”
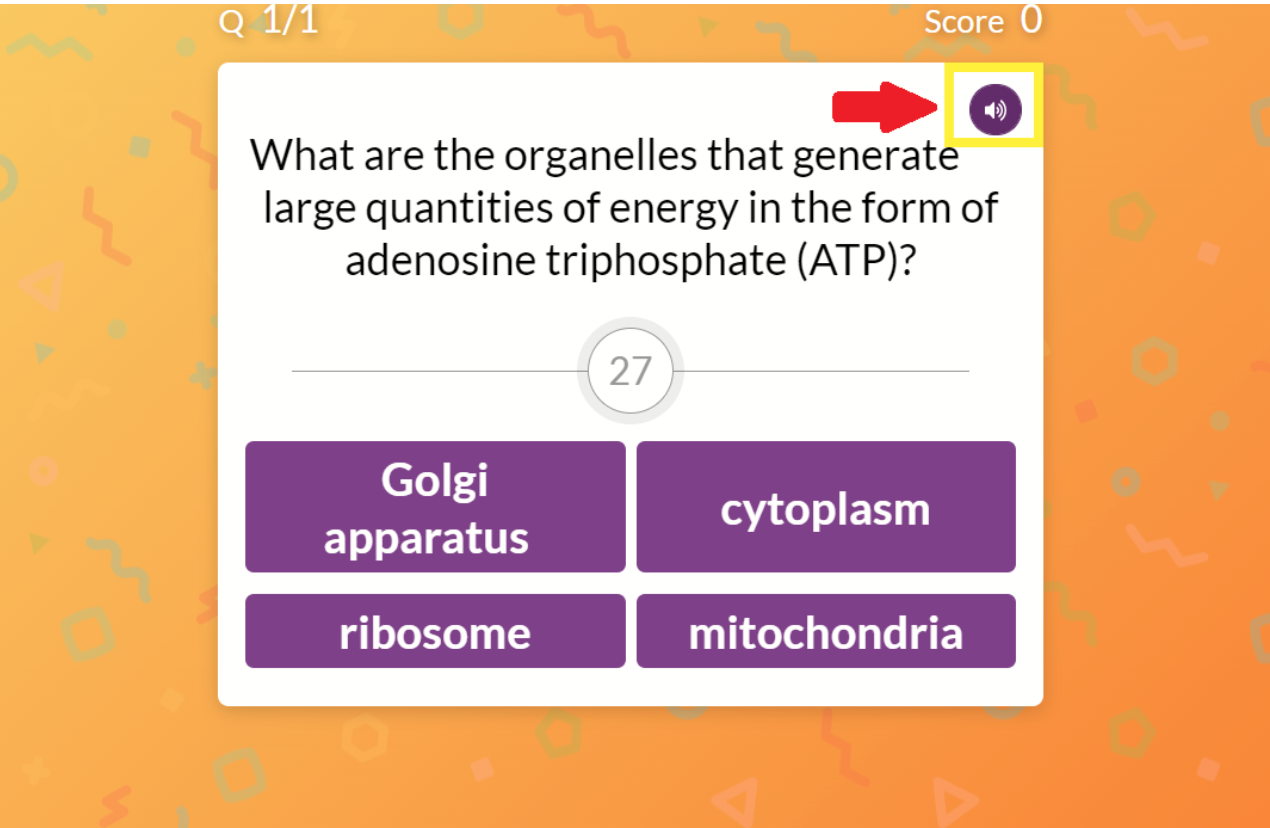
The purpose of this post is to introduce you to the different features provided by Quizalize and help familiarize you with its services. More specifically, you will learn how to:
Create and add a class in QuizalizeAdd students to your ClassAssign quizzes to studentsAssign follow-up activitiesFind ready-made quizzes in Quizalize
How to create and add a class in Quizalize
To create a class for your students on Quizalize, log in to your teacher account and click on ‘Add a new class’ on the right hand side bar. Type in a name for your class and choose how you want your students to join. You have four options to choose from:
By entering their class code into zzi.shRegistering their own Zzi.sh account with email and passwordUsing their Google accountUsing their Microsoft or Office 365 account.
Next, create a course. You can skip this step but creating a course will “tag a curriculum to your class enabling advanced search filtering and a curriculum specific dashboard”. You can add more courses if you want. Once done, click on Create and your class is now set up and has a unique code. You can always edit your classes by clicking on Edit classes.
How to add students to your class on Quizalize
To add students to your class, first open your newly created class and choose whether you want to directly share the class code with students, add them manually in which case you need to click on Add a member manually, or import them from a spreadsheet. click on Import members from spreadsheet.
To be able to log in to Quizalize and take the quiz, students need to enter the zzi.sh URL in a web browser on their laptops or mobile devices. Next, they type in the class code you shared with them and write their names. Once in, they will view a list of all quizzes you have assigned with the most recent ones at the top.
To take a quiz, students click on ‘Start’. As a teacher, you will be able to see each student as they take the quiz, a feature that is only available when you choose to share the quiz live in class using one of the two game views: Leaderboard or Team vs Team.
How to create quizzes on Quizalize
You can easily create your own quizzes on Quizalize. Simply click on one of your classes from the panel on the left then choose Create a new quiz. Type in a title and choose whether you want to align your quiz to a standard or to use a custom topic.
Next, click on Add question to start adding questions to your quiz. You can also import them from a spreadsheet or from Quizlet. If you click on Add question, type in your question then provide the following (optionals): right answer, incorrect answers, answer explanation, and a subtopic or skill.
Tagging questions to a specific subtopic or skill will enable you to view students proficiency for that particular subtopic. “If you have a Premium account, then you must Tag your Quizzes to your state curriculum whenever possible, or otherwise, the student result’ s data will not populate your Mastery Dashboards.”
Set the duration required for students to answer the questions (from 5 seconds to 5 minutes). Your quiz can also include images (maximum file size is 5Mb), audio (5Mb), and text-to-speech (when activated students can have the questions and answers read aloud for them).
Once your quiz is ready, you can then save it to ‘My library’ or assign it to your class by clicking on ‘Save and give to class’.
How to assign quizzes to students
Two types of quizzes you can assign to your students: quizzes you created yourself or quizzes you found in Resources. Also, you can assign quizzes to a single class or to multiple classes at once. To assign a quiz, click on the three dots button of the specific quiz you want to share and choose one of the following options: Play in class or Assign as homework:
A- Play in class
When you choose Play in Class you need to select one of the two gaming modes: Play Leaderboard (students performance is projected live on the screen) or Team Vs Team (Students names appear on the screen and with every answer students names get closer to the flag in the middle).
B- Assign as homework
When you assign a quiz as homework you need to specify a start and end date from the Activity Settings. You can also choose whether you want to turn on/ off Mastery mode (i.e., the quiz will only end when all answers are correct), Use music and sounds (play music and sounds on students devices), Show timer for each question, Number of attempts (set the number of attempts students will be allowed), Number of questions (use all or a selected number of questions picked from the quiz), and many more.
How to assign follow up activities
Each time you assign a quiz you are given the choice to assign follow-up activities. You can choose to assign different follow-up activities to different groups of students. Quizalize arranges students into three main groups that you can assign follow-up activities to:
Students who score less than 50%.students who score between 50%-80%.Students who score 80% or more.
The resources you can assign include: YouTube videos, PDF worksheets, Web activities, or other quizzes .
How to Share quizzes with students
To enable students to access and take a quiz you created you need to share the zz.ish student portal URL and the unique class code. If you assign the quiz as homework then you need to share the URL and the generated code with students using email, chat or post it directly to your LMS.
If you choose to play the quiz in class, both the URL and class code will be displayed at the top of the game view. Keep in mind that each class has a unique class code and make sure that you share the right code with the right class.
You can also share a set of quizzes you created with students and with other teachers. This applies only to quizzes you have created and not to the ones you added from Quizalize resource hub. When you share whole lists of quizzes with students in this way, you will not be able to view students performance data on your dashboard and you can not assign differentiated follow-up resources.
Here is how to share a list of quizzes you created with students:
Click on a quiz you createdClick on your name under the quiz title to access your list of public quizzesCopy the URL from the browser URL bar and share it with students.
How to find ready-made quizzes on Quizalize
Quizalize hosts a growing library of pre-designed quizzes created and shared by other teachers that you can use in your own teaching context. To access these quizzes, click on Resources and type in your search query. You can further refine your search by curriculum, subject and grade. When you find the quiz you are interested in, click on ‘Start a class game’ or ‘Give as homework’.
Quizalize offers different subscription plans. The free plan allows you to “assign quizzes and see results for up to 3 classes and 5 activities, Teacher Dashboard, Team live game and leaderboard, basic online support, Mastery Dashboards (preview). Unlimited & unlocked versions of these features are available under all Premium plans.”
There are several other interesting features which I was not able to cover in this post but I will definitely come to them in future posts.